Step 0 - Verify Visual Studio has the Azure SDK
Before working with any Azure cloud service (Government or Commercial), Visual Studio must first have the Azure SDK installed on it. This provides a great many pre-defined templates and class libraries that developers can use in building their solutions.
To ensure your version has the Azure SDK installed, simply try to create a new project and look for the Cloud option under your preferred language and see that templates are displayed as shown in the following:
If you do NOT have these, click on "Open Visual Studio Installer" at the bottom of the left panel to fire it up and download the Azure SDK.
Step 1 - Install the Azure Environment Selector
Out-of-the-box today, Visual Studio expects developers to be accessing and publishing to the standard Azure Commercial or Enterprise Cloud. Since we are going to be working in the Government cloud, we have to switch the configurations inside of Visual Studio. Rather than do this manually every time from the command prompt or a text editor, we'll be installing the Environment Selector "extension" instead.
From the Tools menu, select Extensions and Updates
From the Extensions window, find and download the "Azure Environment Selector" extension.
Once downloaded you will see an alert at the bottom of the window next to the Close button that alerts you this will be installed once you exit Visual Studio.
Exit Visual Studio and you will be prompted with the Visual Studio Extension installer to modify Visual Studio.
Step 2 - Switch Environments
Upon returning to Visual Studio, you should now see a new item on the Tools menu for the Environment Selector.
Clicking on this new menu item will bring up a dialog box allowing you to change from the Commercial Cloud to the Government Cloud. Once selected this will require a restart of Visual Studio in order to take effect.
Step 3 - Publish Cloud Projects to Azure Government
Now that Visual Studio is targeting Azure Government, open (or create a new) Cloud-Based project and from the project name in the Solution Explorer, right click and "Publish" your service.
Visual Studio will take you to a Publishing wizard that allows you to publish a new service or replace an existing one.
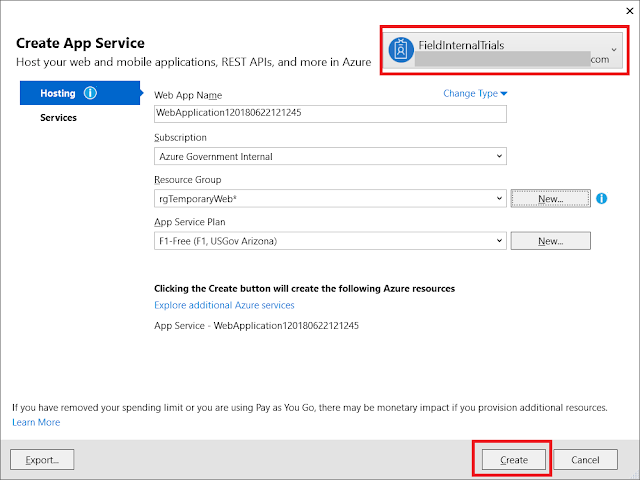
Before you can complete the publishing process, you will need to login to Azure Government with your credentials (shown in the top right of the screen as shown here:


No comments:
Post a Comment