While a little off-topic, this post will focus on how to implement barcode scanning within a C# Windows Phone application. Several times in the past year I have needed this functionality, so rather than continue to re-open my past Visual Studio project files, I'll instead share what I've found and how to make it work. This article will provide a step-by-step approach to adding barcode functionality into your C# Windows Phone application and can be modified somewhat if needed for other Windows Platforms.
For those interested, I've provided a
full sample project here for your reference.
Step 0: Create or Open your C# Windows Phone Project
This article assumes the reader already has a base understanding of using Visual Studio and has already created a Windows Phone 8 or 8.1 project inside of Visual Studio (any edition).
Step 1: Add ZXing to your Project
Thanks to the makers of the
ZXing library, the open source community has shared an amazing set of utility code to read and parse image data for barcodes. This solution makes use of the ZXing port over to .NET called
ZXing.net.
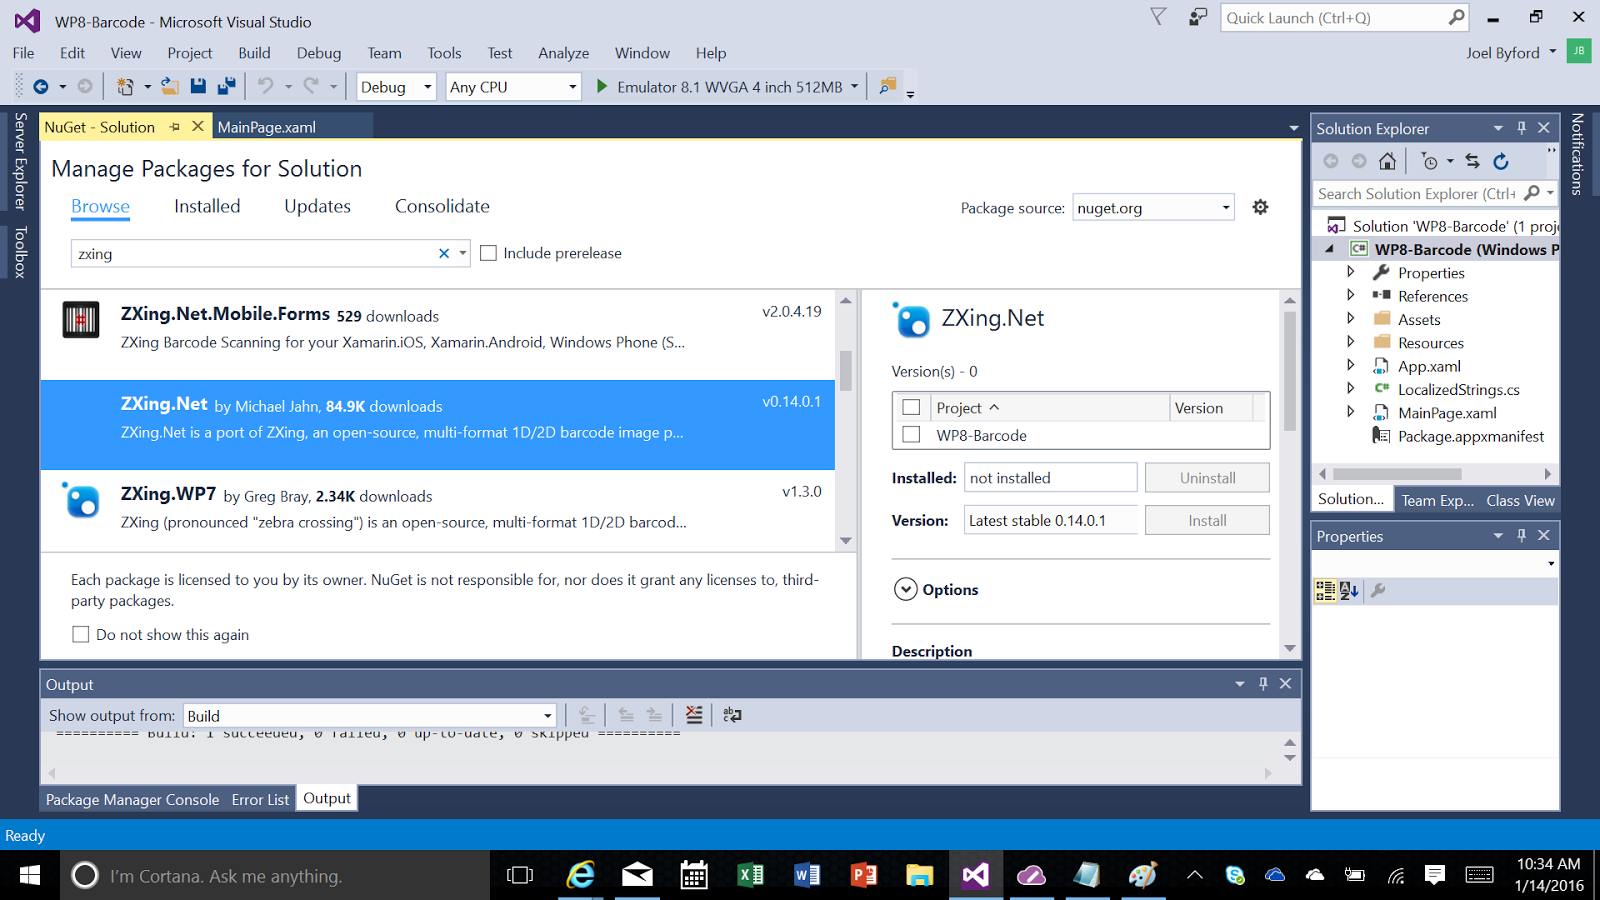
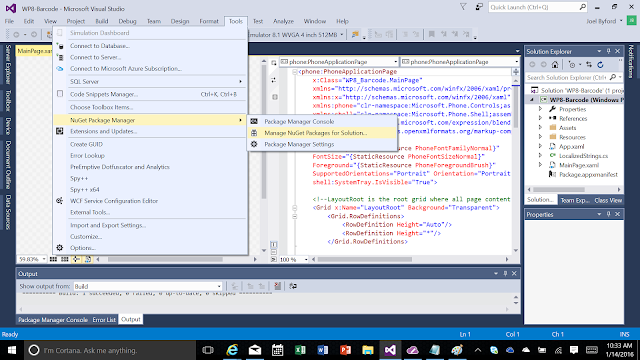
Additionally, the ZXing.net community has made their library available through NuGet, which makes adding it to your project a trivial matter. To use the NuGet package, open the package manager from the Project menu as shown in the following:
Once open, search for the ZXing.net package, and add it by clicking the checkbox associated with the platform being supported (WP8-Barcode in this example).
Once completed, this will install the required package into your project and add all required references.
Step 1 [Shortcut] – Install from Package Manager
Many of the more seasoned developers will know, you can simply add the project to your file by using the package manager command prompt instead.
Install ZXing.net
Step 2 – Add Library Includes (‘using’) References to Page
In order to leverage the camera, image manipulation and ZXing libraries in your code, for ease of use, you’ll want to add references to the libraries to the top of your source code. The following will be required:
using Microsoft.Devices;
using ZXing;
using System.Windows.Threading;
using System.Windows.Media.Imaging;
using System.Windows.Input;
Step 3 - Create XAML Screen as a Viewfinder
Before diving into the c# event handlers and such, lets setup a simple viewfinder where we can show the camera contents, and for this example, simply display whatever barcode we've processed/read. To do this, something similar to the following XAML would be required.
<phone:PhoneApplicationPage
    x:Class="WP8_Barcode.MainPage"
    xmlns="http://schemas.microsoft.com/winfx/2006/xaml/presentation"
    xmlns:x="http://schemas.microsoft.com/winfx/2006/xaml"
    xmlns:phone="clr-namespace:Microsoft.Phone.Controls;assembly=Microsoft.Phone"
    xmlns:shell="clr-namespace:Microsoft.Phone.Shell;assembly=Microsoft.Phone"
    xmlns:d="http://schemas.microsoft.com/expression/blend/2008"
    xmlns:mc="http://schemas.openxmlformats.org/markup-compatibility/2006"
    mc:Ignorable="d"
    FontFamily="{StaticResource PhoneFontFamilyNormal}"
    FontSize="{StaticResource PhoneFontSizeNormal}"
    Foreground="{StaticResource PhoneForegroundBrush}"
    SupportedOrientations="Portrait" Orientation="Portrait"
    shell:SystemTray.IsVisible="True">

    <!--LayoutRoot is the root grid where all page content is placed-->
    <Grid x:Name="LayoutRoot" Background="Transparent">
        <Grid.RowDefinitions>
            <RowDefinition Height="Auto"/>
            <RowDefinition Height="*"/>
            <RowDefinition Height="200"/>
        </Grid.RowDefinitions>


        <!--TitlePanel contains the name of the application and page title-->
        <StackPanel x:Name="TitlePanel" Grid.Row="0" Margin="12,17,0,28">
            <TextBlock Text="WP8 Barcode" Style="{StaticResource PhoneTextNormalStyle}" Margin="12,0"/>
            <TextBlock Text="scan barcode" Margin="9,-7,0,0" Style="{StaticResource PhoneTextTitle1Style}"/>
        </StackPanel>

        <!--ContentPanel - place additional content here-->
        <Grid x:Name="ContentPanel" Grid.Row="1" Margin="12,0,12,0">
            <Canvas x:Name="viewfinderCanvas" Margin="0,0,0,10">
                <!--Camera viewfinder -->
                <Canvas.Background>

                    <VideoBrush x:Name="viewfinderBrush">
                        <VideoBrush.RelativeTransform>
                            <CompositeTransform
                                x:Name="viewfinderTransform"
                                CenterX="0.5"
                                CenterY="0.5"
                                Rotation="90"/>
                        </VideoBrush.RelativeTransform>
                    </VideoBrush>
                </Canvas.Background>
                <TextBlock
                    x:Name="focusBrackets"
                    Text="[   ]"
                    FontSize="40" Visibility="Collapsed"/>

                <TextBlock Canvas.Left="100" TextWrapping="Wrap" Text="Tap to read the Barcode" Canvas.Top="200" Width="233" FontFamily="Segoe UI"/>
            </Canvas>


        </Grid>
        <StackPanel Grid.Row="2" Margin="20, 0">
            <TextBlock Text="Barcode Type:"/>
            <TextBlock x:Name="tbBarcodeType" FontWeight="ExtraBold" Text="[Please Scan]"/>
            <TextBlock Text="Barcode Data:"/>
            <TextBlock x:Name="tbBarcodeData" FontWeight="ExtraBold" TextWrapping="Wrap" Text="[Please Scan]"/>
        </StackPanel>

    </Grid>

</phone:PhoneApplicationPage>
Step 4 - Define the Private Local Variables Required
Several of the core objects we'll be using will have a scope beyond the method being executed, therefore we will need to define some private variables to hold pointers to these objects.
//private locals
private PhotoCamera _phoneCamera;
private IBarcodeReader _barcodeReader;
private DispatcherTimer _scanTimer;
private WriteableBitmap _previewBuffer;
Step 5 - Initialize the Camera and Add Event Handlers
This can be done anywhere in your code (for example on a button press), but for this example, I've added it to the OnNavigatedTo method.
protected override void OnNavigatedTo(System.Windows.Navigation.NavigationEventArgs e)
        {
            // Initialize the camera object
            _phoneCamera = new Microsoft.Devices.PhotoCamera(CameraType.Primary);

            //event callbacks defined
            _phoneCamera.Initialized += new EventHandler(cam_Initialized);
            _phoneCamera.AutoFocusCompleted += _phoneCamera_AutoFocusCompleted;
            CameraButtons.ShutterKeyHalfPressed += CameraButtons_ShutterKeyHalfPressed;
            viewfinderCanvas.Tap += new EventHandler(focus_Tapped);

            //Display the camera feed in the UI
            viewfinderBrush.SetSource(_phoneCamera);


            // This timer will be used to scan the camera buffer every 250ms and scan for any barcodes
            _scanTimer = new DispatcherTimer();
            _scanTimer.Interval = TimeSpan.FromMilliseconds(250);
            _scanTimer.Tick += (o, arg) => ScanForBarcode();


            base.OnNavigatedTo(e);
        }
As shown above, the device's camera object needs to be initialized, callbacks assigned to the event methods (see later steps for each of these callback definitions), and a timer initiated to periodically get whatever is in the camera buffer. This could also be changed to only grab the camera buffer on an event of some kind (e.g. camera button pressed, screen tapped, etc.) but for this example, it has been just established as a periodic 250ms.
Step 6 - Include an Autofocus Completed Event Handler
The viewfinder in this example includes a set of brackets '[ ]' in the UI to allow the user to define the point of focus when they tap the screen. Once the autofocus has been completed, this callback method is triggered to simply show where the brackets should appear on the page.
void _phoneCamera_AutoFocusCompleted(object sender, CameraOperationCompletedEventArgs e)
        {
            Deployment.Current.Dispatcher.BeginInvoke(delegate ()
            {
                focusBrackets.Visibility = Visibility.Collapsed;
            });
        }
Step 7 - Include a Screen Tap Event Handler
To support focusing on a single point within the virtual viewfinder, we have to add an event handler for the screen tap event (see OnNavigatedTo method above for where the event is assigned).
void focus_Tapped(object sender, System.Windows.Input.GestureEventArgs e)
        {
            try
            {
                if (_phoneCamera != null)
                {
                    if (_phoneCamera.IsFocusAtPointSupported == true)
                    {
                        // Determine the location of the tap.
                        Point tapLocation = e.GetPosition(viewfinderCanvas);

                        // Position the focus brackets with the estimated offsets.
                        focusBrackets.SetValue(Canvas.LeftProperty, tapLocation.X - 30);
                        focusBrackets.SetValue(Canvas.TopProperty, tapLocation.Y - 28);

                        // Determine the focus point.
                        double focusXPercentage = tapLocation.X / viewfinderCanvas.ActualWidth;
                        double focusYPercentage = tapLocation.Y / viewfinderCanvas.ActualHeight;

                        // Show the focus brackets and focus at point.
                        focusBrackets.Visibility = Visibility.Visible;
                        _phoneCamera.FocusAtPoint(focusXPercentage, focusYPercentage);
                    }
                }
            }
            catch (Exception ex)
            {
                _phoneCamera.Initialized += new EventHandler(cam_Initialized);
            }
        }
Step 8 - Include a Half-Press Camera Button Handler
As with the above, if our device supports half-presses from the camera button, use it to trigger the camera's autofocus.
void CameraButtons_ShutterKeyHalfPressed(object sender, EventArgs e)
        {
            _phoneCamera.Focus();
        }
Step 9 - Include some final Configuration in the Camera Initialized Event
Some final configuration can be added once we know the camera is initialized, and we can begin our camera scan timer and start attempting reads. Optionally, this timer can be removed and only await a camera press or screen tap.
void CameraButtons_ShutterKeyHalfPressed(object sender, EventArgs e)
        {
            _phoneCamera.Focus();
        }
Step 10 - Include Scan for Barcode Logic
We add this method to save temporary images to the camera buffer and we make calls to ZXing to decode the content within this buffer.
private void ScanForBarcode()
        {
            //grab a camera snapshot
            _phoneCamera.GetPreviewBufferArgb32(_previewBuffer.Pixels);
            _previewBuffer.Invalidate();

            //scan the captured snapshot for barcodes
            //if a barcode is found, the ResultFound event will fire
            _barcodeReader.Decode(_previewBuffer);
        }
Step 11 - Add a Barcode Found Callback
This method is called whenever ZXing yields a result from the decoding attempt. This is where we can add logic to parse the barcode data, save it in memory, or even navigate away from the screen if we just wanted to scan a single barcode.
void _bcReader_ResultFound(Result obj)
        {
            // If a new barcode is found, vibrate the device and display the barcode details in the UI
            if (!obj.Text.Equals(tbBarcodeData.Text))
            {
                VibrateController.Default.Start(TimeSpan.FromMilliseconds(100));
                tbBarcodeType.Text = obj.BarcodeFormat.ToString();
                tbBarcodeData.Text = obj.Text;
                //do something real with the scan (e.g. persist it to a the State or ViewModel object before you leave the page)
                //PhoneApplicationService.Current.State["Text"] = obj.Text;

                //Navigate to some other page if you're done scanning
                //NavigationService.GoBack();
                //NavigationService.Navigate(new Uri("/PageYouWantToGetResult.xaml", UriKind.Relative));
            }

        }
Step 12 - Include Cleanup Logic
With camera and device access on Windows Phone, it is ABSOLUTELY CRITICAL that we cleanup our variables once we're done with them. If omitted, it is possible for your camera to keep on capturing and processing data, leaving flashes flashing, and simply crash your application. We've chosen to include all the cleanup code in OnNavigatedFrom method, or is automatically called by the system when a user navigates away from this page.
protected override void OnNavigatingFrom(System.Windows.Navigation.NavigatingCancelEventArgs e)
        {
            //we're navigating away from this page, be sure to run this cleanup or you'll have issues
            _scanTimer.Stop();

            if (_phoneCamera != null)
            {
                // Cleanup
                _phoneCamera.Dispose();
                _phoneCamera.Initialized -= cam_Initialized;
                CameraButtons.ShutterKeyHalfPressed -= CameraButtons_ShutterKeyHalfPressed;
            }
        }
Step 13 - Specify Application Capabilities
With Windows Phone and Windows Store applications, it is mandatory that you specify what capabilities your application requires in order to be used within the Application Manifest File (WMAppManifest.xml). If this isn't set, your application will not be granted access to the device/sensor required, and will therefore keep crashing when attempting these unpermitted steps. For this application, we need to grant rights for the application to use the camera and, just to be safe, the photo library, as shown in the following.
Step 14 - Specify Application Requirements
Additionally, in the same file (WMAppManifest.xml), there is also a section for specifying the minimum requirements for the device running your app. In this case, we'll of courses require a camera, so you'll want to flag this as a requirement for your application as shown in the following.
Step 15 - Update Packaging with Capabilities for the Storefront
While not technically mandatory, it is considered good policy to update your application's packaging to ensure the Windows Store storefront page conveys your application requirements properly. This is done by updating the Package.appmanifest file within Visual Studio. For this simple application, I've marked that we're accessing the "webcam" and "pictures library" as they seem to be the best fit. This is also where you will want to version your application so that the package file automatically updates the storefront when you upload your package to the store.
Final - Compile and Run
If all the above is correct, you should be able to build and run your application. Since you'll be using the camera on a device, I'd recommend targeting your developer device (and not the emulator), so you can scan some web-generated QR Codes or other Bar Code Types. Any troubles, try
downloading the sample application as a whole and running the sample package to see if you are missing any SDK's. The sample was built using the free Visual Studio 15 Community Edition with .NET and WindowsMobile 8 SDK's.