Showing posts with label Example. Show all posts

Monday, June 11, 2018

C#: Sharing a Visual Studio Pro 2017 Project on GitHub

This article will go through and provide a step-by-step guide on how to post a Visual Studio 2017 Project and Solution to a newly established GitHub Repository (repo).  As with many tools, there are a multitude of paths to take and different ways to accomplish a task like this.  This just provides one possible path to accomplish this task.

Step 1 - Add GitHub Tools to Visual Studio

Before we can use GitHub from within Visual Studio 2017, we need to install the plug-in to make it easier to manage.  You can of course just use Git from the command line as well. . . .this article instead looks at the GUI though.
From the Tools menu, navigate to Extensions and Updates.


Once the Extensions and Updates window opens up, navigate to the "Online" item and search for "GitHub".  The "GitHub Extension for Visual Studio" (the one with the official GitHub icon) is the extension you're looking for.  Find it and Install it.  


Step 2 - Configure the Team Explorer

For this next step, I'll assume you have the Professional or Enterprise edition installed with Team Explorer functionality.  Navigate to the Team Explorer if you don't already see it on your screen by going to View >> Team Explorer.


In the Team Explorer window, click on the plug-shaped connections icon to add a new connection to GitHub.


From here, we need to login to GitHub with your GitHub account (just go sign-up for a new account if you don't have one yet). 

Step 3 - Create a New GitHub Repo

Now that you've connected GitHub to your Visual Studio environment, you should see your existing GitHub repos listed in the Team Explorer Connect screen.  For this tutorial, we'll create a new repo for a new project by clicking on the "Create" link and entering some details about the repo in the accompanying pop-up window.


WARNING: you will not be able to mark the repo as "Private Repository" unless you have a paid GitHub Account.  Free accounts are only available publicly for all to see.  Again, just to reiterate. . . .the new repo you create will, by default, be PUBLIC and available for ANYONE to see.  

Assuming your create request was successful, you will see a resulting success alert in the Team Services window.

Step 4 - Create a New Solution & Project In the Repo

Now that we have a repo, we can navigate back to the Team Explorer Tab and select our newly created repo to make it active in our work-space.


Once selected, the "Home" subtab inside of the Team Explorer should open and present you with a list of actions you can take with the repo.  Initially, we see that no project has been created or associated with this repo, so we will choose the "New.." link under Solutions.


This will bring up the familiar New Project wizard to allow you to pick your project type and name your project.  For this demo, we will just create a sample web project.


Once created, we can navigate back to the Solution Explorer and see our project exists and source code control icons exist next to each file to denote the status of each file under source control.  By default, Visual Studio includes all relevate source code files but one can add items to be excluded (e.g. add them to the .gitignore) pretty easily later on the commit page.


You should also note, that the toolbar at the bottom of the Visual Studio window now shows a number of Git-related icons that can be interacted with to view edits, make a pull request and select the active branch you are working in at the moment.

Step 5 - Commit Your Work Locally

Git, as an open standard, allows users to work locally on their machines with a copy of the source code in a local repo, and then when satisfied the code is correct, it allows you to commit your changes locally first, then eventually (and separately) commit your code externally to your server or cloud provider.
The first part is committing our work to our local repo hosted on our machine.
In order to do this, we simply click on the pencil icon in the toolbar, or choose "Changes" from the Team Explorer.


Step 6 - Commit Your Code to Cloud

Now that the code has been committed locally, it's time to commit our changes to the GitHub servers.  In order to active this process, we simply choose "Sync" from the Project Explorer to allow Git to see if anyone has already made changes on the server that need to be resolved on our client before posting our changes.  


Once Git has done its job and you have addressed any conflicts, the changes can be "Pushed" to the cloud from the Sync page.


If the push was completed successfully, a warning appears on the Team Explorer like so:


And you can navigate to https://www.github.com/ to see that your project is now accessible in the new Git Repo you created.


Thursday, January 28, 2016

C#: Barcode Scanning with Windows Phone 8

While a little off-topic, this post will focus on how to implement barcode scanning within a C# Windows Phone application.  Several times in the past year I have needed this functionality, so rather than continue to re-open my past Visual Studio project files, I'll instead share what I've found and how to make it work.  This article will provide a step-by-step approach to adding barcode functionality into your C# Windows Phone application and can be modified somewhat if needed for other Windows Platforms.
For those interested, I've provided a full sample project here for your reference.

Step 0: Create or Open your C# Windows Phone Project

This article assumes the reader already has a base understanding of using Visual Studio and has already created a Windows Phone 8 or 8.1 project inside of Visual Studio (any edition). 

Step 1: Add ZXing to your Project

Thanks to the makers of the ZXing library, the open source community has shared an amazing set of utility code to read and parse image data for barcodes.  This solution makes use of the ZXing port over to .NET called ZXing.net
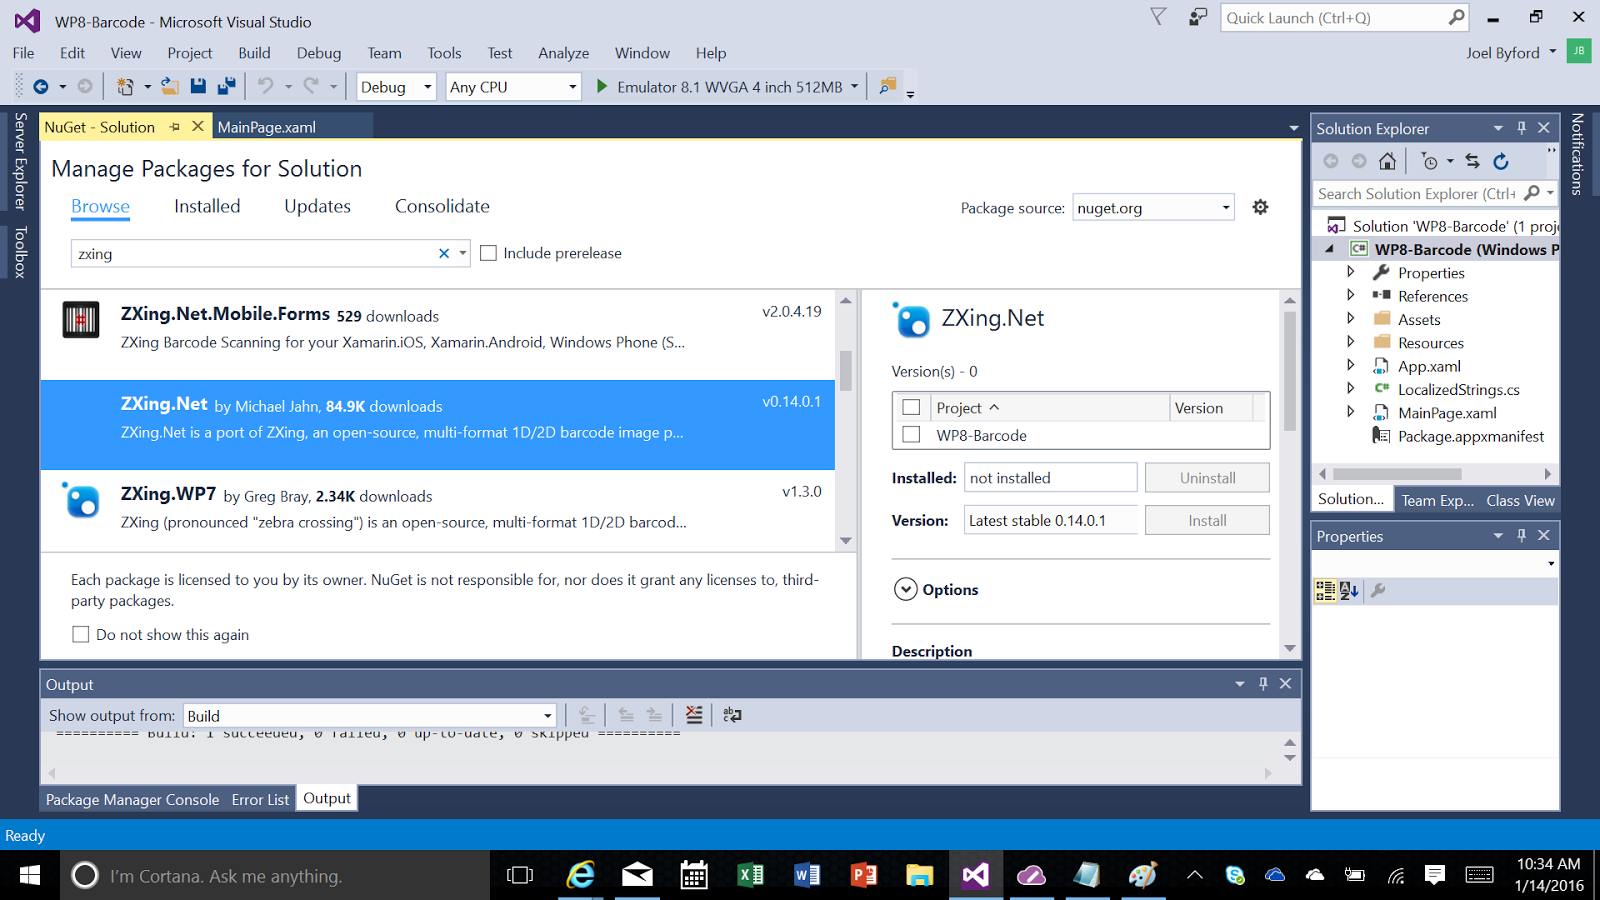
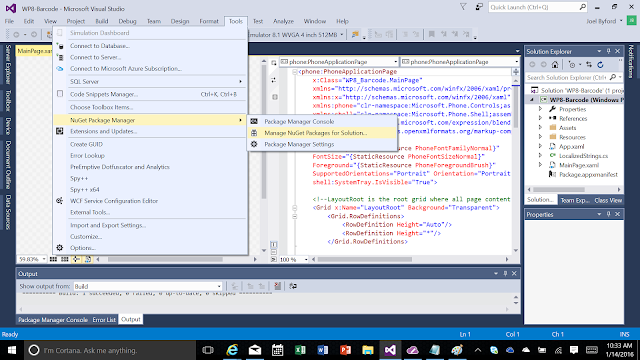
Additionally, the ZXing.net community has made their library available through NuGet, which makes adding it to your project a trivial matter.  To use the NuGet package, open the package manager from the Project menu as shown in the following:


Once open, search for the ZXing.net package, and add it by clicking the checkbox associated with the platform being supported (WP8-Barcode in this example).


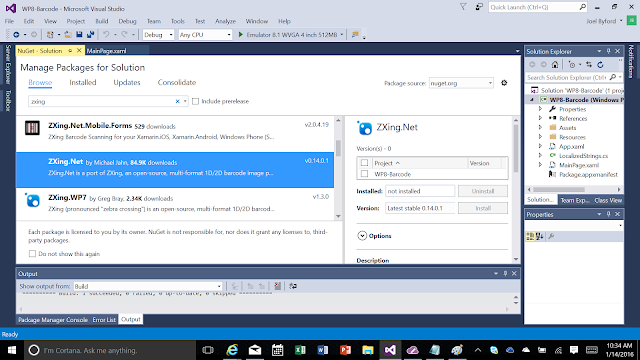
Once completed, this will install the required package into your project and add all required references. 

Step 1 [Shortcut] – Install from Package Manager

Many of the more seasoned developers will know, you can simply add the project to your file by using the package manager command prompt instead. 
Install ZXing.net

Step 2 – Add Library Includes (‘using’) References to Page

In order to leverage the camera, image manipulation and ZXing libraries in your code, for ease of use, you’ll want to add references to the libraries to the top of your source code.  The following will be required:
using Microsoft.Devices;
using ZXing;
using System.Windows.Threading;
using System.Windows.Media.Imaging;
using System.Windows.Input;

Step 3 - Create XAML Screen as a Viewfinder

Before diving into the c# event handlers and such, lets setup a simple viewfinder where we can show the camera contents, and for this example, simply display whatever barcode we've processed/read. To do this, something similar to the following XAML would be required.

<phone:PhoneApplicationPage
    x:Class="WP8_Barcode.MainPage"
    xmlns="http://schemas.microsoft.com/winfx/2006/xaml/presentation"
    xmlns:x="http://schemas.microsoft.com/winfx/2006/xaml"
    xmlns:phone="clr-namespace:Microsoft.Phone.Controls;assembly=Microsoft.Phone"
    xmlns:shell="clr-namespace:Microsoft.Phone.Shell;assembly=Microsoft.Phone"
    xmlns:d="http://schemas.microsoft.com/expression/blend/2008"
    xmlns:mc="http://schemas.openxmlformats.org/markup-compatibility/2006"
    mc:Ignorable="d"
    FontFamily="{StaticResource PhoneFontFamilyNormal}"
    FontSize="{StaticResource PhoneFontSizeNormal}"
    Foreground="{StaticResource PhoneForegroundBrush}"
    SupportedOrientations="Portrait" Orientation="Portrait"
    shell:SystemTray.IsVisible="True">

    <!--LayoutRoot is the root grid where all page content is placed-->
    <Grid x:Name="LayoutRoot" Background="Transparent">
        <Grid.RowDefinitions>
            <RowDefinition Height="Auto"/>
            <RowDefinition Height="*"/>
            <RowDefinition Height="200"/>
        </Grid.RowDefinitions>


        <!--TitlePanel contains the name of the application and page title-->
        <StackPanel x:Name="TitlePanel" Grid.Row="0" Margin="12,17,0,28">
            <TextBlock Text="WP8 Barcode" Style="{StaticResource PhoneTextNormalStyle}" Margin="12,0"/>
            <TextBlock Text="scan barcode" Margin="9,-7,0,0" Style="{StaticResource PhoneTextTitle1Style}"/>
        </StackPanel>

        <!--ContentPanel - place additional content here-->
        <Grid x:Name="ContentPanel" Grid.Row="1" Margin="12,0,12,0">
            <Canvas x:Name="viewfinderCanvas" Margin="0,0,0,10">
                <!--Camera viewfinder -->
                <Canvas.Background>

                    <VideoBrush x:Name="viewfinderBrush">
                        <VideoBrush.RelativeTransform>
                            <CompositeTransform
                                x:Name="viewfinderTransform"
                                CenterX="0.5"
                                CenterY="0.5"
                                Rotation="90"/>
                        </VideoBrush.RelativeTransform>
                    </VideoBrush>
                </Canvas.Background>
                <TextBlock 
                    x:Name="focusBrackets" 
                    Text="[   ]" 
                    FontSize="40" Visibility="Collapsed"/>

                <TextBlock Canvas.Left="100" TextWrapping="Wrap" Text="Tap to read the Barcode" Canvas.Top="200" Width="233" FontFamily="Segoe UI"/>
            </Canvas>


        </Grid>
        <StackPanel Grid.Row="2" Margin="20, 0">
            <TextBlock Text="Barcode Type:"/>
            <TextBlock x:Name="tbBarcodeType" FontWeight="ExtraBold" Text="[Please Scan]"/>
            <TextBlock Text="Barcode Data:"/>
            <TextBlock x:Name="tbBarcodeData" FontWeight="ExtraBold" TextWrapping="Wrap" Text="[Please Scan]"/>
        </StackPanel>

    </Grid>

</phone:PhoneApplicationPage>

Step 4 - Define the Private Local Variables Required


Several of the core objects we'll be using will have a scope beyond the method being executed, therefore we will need to define some private variables to hold pointers to these objects.
//private locals
private PhotoCamera _phoneCamera;
private IBarcodeReader _barcodeReader;
private DispatcherTimer _scanTimer;
private WriteableBitmap _previewBuffer;

Step 5 - Initialize the Camera and Add Event Handlers

This can be done anywhere in your code (for example on a button press), but for this example, I've added it to the OnNavigatedTo method.
protected override void OnNavigatedTo(System.Windows.Navigation.NavigationEventArgs e)
        {
            // Initialize the camera object
            _phoneCamera = new Microsoft.Devices.PhotoCamera(CameraType.Primary);

            //event callbacks defined
            _phoneCamera.Initialized += new EventHandler(cam_Initialized);
            _phoneCamera.AutoFocusCompleted += _phoneCamera_AutoFocusCompleted;
            CameraButtons.ShutterKeyHalfPressed += CameraButtons_ShutterKeyHalfPressed;
            viewfinderCanvas.Tap += new EventHandler(focus_Tapped);

            //Display the camera feed in the UI
            viewfinderBrush.SetSource(_phoneCamera);


            // This timer will be used to scan the camera buffer every 250ms and scan for any barcodes
            _scanTimer = new DispatcherTimer();
            _scanTimer.Interval = TimeSpan.FromMilliseconds(250);
            _scanTimer.Tick += (o, arg) => ScanForBarcode();


            base.OnNavigatedTo(e);
        }
As shown above, the device's camera object needs to be initialized, callbacks assigned to the event methods (see later steps for each of these callback definitions), and a timer initiated to periodically get whatever is in the camera buffer. This could also be changed to only grab the camera buffer on an event of some kind (e.g. camera button pressed, screen tapped, etc.) but for this example, it has been just established as a periodic 250ms.

Step 6 - Include an Autofocus Completed Event Handler

The viewfinder in this example includes a set of brackets '[ ]' in the UI to allow the user to define the point of focus when they tap the screen. Once the autofocus has been completed, this callback method is triggered to simply show where the brackets should appear on the page.
void _phoneCamera_AutoFocusCompleted(object sender, CameraOperationCompletedEventArgs e)
        {
            Deployment.Current.Dispatcher.BeginInvoke(delegate ()
            {
                focusBrackets.Visibility = Visibility.Collapsed;
            });
        }

Step 7 - Include a Screen Tap Event Handler

To support focusing on a single point within the virtual viewfinder, we have to add an event handler for the screen tap event (see OnNavigatedTo method above for where the event is assigned).
void focus_Tapped(object sender, System.Windows.Input.GestureEventArgs e)
        {
            try
            {
                if (_phoneCamera != null)
                {
                    if (_phoneCamera.IsFocusAtPointSupported == true)
                    {
                        // Determine the location of the tap.
                        Point tapLocation = e.GetPosition(viewfinderCanvas);

                        // Position the focus brackets with the estimated offsets.
                        focusBrackets.SetValue(Canvas.LeftProperty, tapLocation.X - 30);
                        focusBrackets.SetValue(Canvas.TopProperty, tapLocation.Y - 28);

                        // Determine the focus point.
                        double focusXPercentage = tapLocation.X / viewfinderCanvas.ActualWidth;
                        double focusYPercentage = tapLocation.Y / viewfinderCanvas.ActualHeight;

                        // Show the focus brackets and focus at point.
                        focusBrackets.Visibility = Visibility.Visible;
                        _phoneCamera.FocusAtPoint(focusXPercentage, focusYPercentage);
                    }
                }
            }
            catch (Exception ex)
            {
                _phoneCamera.Initialized += new EventHandler(cam_Initialized);
            }
        }

Step 8 - Include a Half-Press Camera Button Handler

As with the above, if our device supports half-presses from the camera button, use it to trigger the camera's autofocus.
void CameraButtons_ShutterKeyHalfPressed(object sender, EventArgs e)
        {
            _phoneCamera.Focus();
        }

Step 9 - Include some final Configuration in the Camera Initialized Event

Some final configuration can be added once we know the camera is initialized, and we can begin our camera scan timer and start attempting reads. Optionally, this timer can be removed and only await a camera press or screen tap.
void CameraButtons_ShutterKeyHalfPressed(object sender, EventArgs e)
        {
            _phoneCamera.Focus();
        }

Step 10 - Include Scan for Barcode Logic

We add this method to save temporary images to the camera buffer and we make calls to ZXing to decode the content within this buffer.
private void ScanForBarcode()
        {
            //grab a camera snapshot
            _phoneCamera.GetPreviewBufferArgb32(_previewBuffer.Pixels);
            _previewBuffer.Invalidate();

            //scan the captured snapshot for barcodes
            //if a barcode is found, the ResultFound event will fire
            _barcodeReader.Decode(_previewBuffer);
        }

Step 11 - Add a Barcode Found Callback

This method is called whenever ZXing yields a result from the decoding attempt. This is where we can add logic to parse the barcode data, save it in memory, or even navigate away from the screen if we just wanted to scan a single barcode.
void _bcReader_ResultFound(Result obj)
        {
            // If a new barcode is found, vibrate the device and display the barcode details in the UI
            if (!obj.Text.Equals(tbBarcodeData.Text))
            {
                VibrateController.Default.Start(TimeSpan.FromMilliseconds(100));
                tbBarcodeType.Text = obj.BarcodeFormat.ToString();
                tbBarcodeData.Text = obj.Text;
                //do something real with the scan (e.g. persist it to a the State or ViewModel object before you leave the page)
                //PhoneApplicationService.Current.State["Text"] = obj.Text;

                //Navigate to some other page if you're done scanning
                //NavigationService.GoBack();
                //NavigationService.Navigate(new Uri("/PageYouWantToGetResult.xaml", UriKind.Relative));
            }

        }

Step 12 - Include Cleanup Logic

With camera and device access on Windows Phone, it is ABSOLUTELY CRITICAL that we cleanup our variables once we're done with them. If omitted, it is possible for your camera to keep on capturing and processing data, leaving flashes flashing, and simply crash your application. We've chosen to include all the cleanup code in OnNavigatedFrom method, or is automatically called by the system when a user navigates away from this page.
protected override void OnNavigatingFrom(System.Windows.Navigation.NavigatingCancelEventArgs e)
        {
            //we're navigating away from this page, be sure to run this cleanup or you'll have issues
            _scanTimer.Stop();

            if (_phoneCamera != null)
            {
                // Cleanup
                _phoneCamera.Dispose();
                _phoneCamera.Initialized -= cam_Initialized;
                CameraButtons.ShutterKeyHalfPressed -= CameraButtons_ShutterKeyHalfPressed;
            }
        }

Step 13 - Specify Application Capabilities

With Windows Phone and Windows Store applications, it is mandatory that you specify what capabilities your application requires in order to be used within the Application Manifest File (WMAppManifest.xml). If this isn't set, your application will not be granted access to the device/sensor required, and will therefore keep crashing when attempting these unpermitted steps. For this application, we need to grant rights for the application to use the camera and, just to be safe, the photo library, as shown in the following.

Step 14 - Specify Application Requirements

Additionally, in the same file (WMAppManifest.xml), there is also a section for specifying the minimum requirements for the device running your app. In this case, we'll of courses require a camera, so you'll want to flag this as a requirement for your application as shown in the following.

Step 15 - Update Packaging with Capabilities for the Storefront

While not technically mandatory, it is considered good policy to update your application's packaging to ensure the Windows Store storefront page conveys your application requirements properly. This is done by updating the Package.appmanifest file within Visual Studio. For this simple application, I've marked that we're accessing the "webcam" and "pictures library" as they seem to be the best fit. This is also where you will want to version your application so that the package file automatically updates the storefront when you upload your package to the store.

Final - Compile and Run

If all the above is correct, you should be able to build and run your application. Since you'll be using the camera on a device, I'd recommend targeting your developer device (and not the emulator), so you can scan some web-generated QR Codes or other Bar Code Types. Any troubles, try downloading the sample application as a whole and running the sample package to see if you are missing any SDK's. The sample was built using the free Visual Studio 15 Community Edition with .NET and WindowsMobile 8 SDK's.

Thursday, December 20, 2012

XSLT: Select Distinct in XSL 1.0

cThe further one dives into XSLT, it may become necessary to extract a list of unique values from an XML document. This is commonly done in SQL through the SELECT DISTINCT statement, unfortunately, there is no direct equivalent in XSLT 1.0.

In order to perform this sort of functionality, one must leverage some of the more advanced aspects of XSLT including the preceding-sibling:: or another such "axis" as it's known in XSL.

To better understand, lets look at an example.  Given the following XSD snippet:

<?xml version="1.0" encoding="UTF-8"?>
<xsd:schema xmlns:xsd="http://www.w3.org/2001/XMLSchema">
    <xsd:element name="houseCategory" abstract="true"/>
    <xsd:element name="houseCategoryText" type="xsd:string" substitutionGroup="houseCategory"/>
    <xsd:element name="houseCategoryFlag" type="xsd:boolean" substitutionGroup="houseCategory"/>
    <xsd:element name="housePurchaseDateRepresentation" abstract="true"/>
    <xsd:element name="housePurchaseDate" type="xsd:date" substitutionGroup="housePurchaseDateRepresentation"/>
    <xsd:element name="housePurchaseDateTime" type="xsd:dateTime" substitutionGroup="housePurchaseDateRepresentation"/>
</xsd:schema>

The following XSLT will extract a list of unique substitutionGroup attribute values from above and list them in the output: 

<?xml version="1.0" encoding="UTF-8"?>
  <xsl:stylesheet xmlns:xsl="http://www.w3.org/1999/XSL/Transform" version="1.0" xmlns:xsd="http://www.w3.org/2001/XMLSchema" >
  <xsl:output method="xml" indent="yes"/>
  <xsl:template match="*">
    <xsl:for-each
        select="/xsd:schema/xsd:element/@substitutionGroup[not(. = ../preceding-sibling::xsd:element/@substitutionGroup/.)]">
        
        <xsl:element name="uniqueSubstitutionGroup">
            <xsl:value-of select="."/>
        </xsl:element>
        
    </xsl:for-each>    
  </xsl:template>
</xsl:stylesheet>

The resulting output would appear something like the following:

<?xml version="1.0" encoding="utf-8"?>
<uniqueSubstitutionGroup>houseCategory</uniqueSubstitutionGroup>
<uniqueSubstitutionGroup>housePurchaseDateRepresentation</uniqueSubstitutionGroup>

The information surrounding this question was sourced in part from information provided on Stack Overflow here

Wednesday, October 24, 2012

XSLT: Namespace From Prefix in XSL 1.0

When transforming XML Schema (XSD) files in XSLT 1.0, it quickly becomes necessary to resolve the namespace from the prefix of any given element or attribute.  Sometimes these elements and attributes are not stored as actual elements and attributes, which makes it necessary to resolve them in a different manner. For example, in the following XSD snippet, iso_639-3:LanguageCodeSimpleType is not a node, element nor is it an attribute, rather it is a text value of the type attribute.

<xsd:schema 
  xmlns:xsd="http://www.w3.org/2001/XMLSchema" 
  xmlns:iso_639-3="http://niem.gov/niem/iso_639-3/2.0">
    <xsd:attribute name="languageCode" 
      type="iso_639-3:LanguageCodeSimpleType"/>
</xsd:schema>

One way to resolve what namespace the iso_639-3 prefix is associated with, is to extract the prefix from the text and use the following simple XSLT 1.0 function/template.

<xsl:template name="namespaceFromPrefix">
  <xsl:param name="sPrefix"/>
  <xsl:value-of select="/*/namespace::*[name() = $sPrefix]"/>
</xsl:template>

If one were to pass in the prefix iso_639-3 the return value would be http://niem.gov/niem/iso_639-3/2.0

Friday, September 21, 2012

XSLT: Extract a Branch from an XML Tree

Often you may wish to extract a portion of an XML file including all of its children elements so as to better deal with it or further transform or handle it elsewhere. 

For example, in web-service-based development, it is common for a developer to “extract” the payload from a request or response envelope.  This can also be in situations where a NIEM developer wishes to obtain the payload portion of a LEXS package and further process, store or display it. 

With XSLT, it only takes the following few lines of code to pull a branch of XML out of a larger package.

<xsl:stylesheet xmlns:xsl="http://www.w3.org/1999/XSL/Transform"
    version="1.0">
    <xsl:output method="xml" indent="yes"/>
    
    <xsl:template match="/uml">
        <xsl:apply-templates select="XMI" mode="RecursiveDeepCopy" />
    </xsl:template> 
    
    <xsl:template match="@*|node()" mode="RecursiveDeepCopy">
        <xsl:copy>
            <xsl:copy-of select="@*" />
            <xsl:apply-templates mode="RecursiveDeepCopy" />
        </xsl:copy> 
    </xsl:template> 

</xsl:stylesheet>

In the above example, the XMI/* elements and attributes are being extracted from the /uml/ container element. Before the transform, the XML would look something like this:

<uml>
  <XMI>
    <XMI.header/>
    <XMI.content/>
  </XMI>
</uml>

And after it would look like this:

<XMI>
  <XMI.header/>
  <XMI.content/>
</XMI>

For information on similar transforms, simply Google or Bing "Identity transforms."

Saturday, September 8, 2012

XSD: Extending Code Lists with xsd:union

In certain circumstances it is necessary to add elements to an existing NIEM enumeration (or code list).  In these situations one may choose to simply recreate a new list with all the same elements already defined in a NIEM code type and simply add those which do not yet exist.  However, when the code list is larger than a few elements (such as a state code list with at least 50 valid values), using xsd:union as an option becomes more appealing.

The xsd:union provides a way to combine simple data types together to form a larger and more comprehensive data type.  An example would be simply adding “ZZ” to a list of US Postal Service State (USPS) Codes to communicate an unknown or invalid state.  This can be accomplished by extending the existing USPS code list in several steps.

Step 1 – Create a New Simple Type With New Values

<!-- Simple code value to add ZZ as a valid value -->
<xsd:simpletype name="USStateCodeDefaultSimpleType">
  <xsd:restriction base="xsd:token">
   <xsd:enumeration value="ZZ">
    <xsd:annotation>
     <xsd:documentation>UNKNOWN</xsd:documentation>
    </xsd:annotation>
   </xsd:enumeration>
  </xsd:restriction>
</xsd:simpletype>

Step 2 – Use xsd:union to Join the Values with Existing Values

<!-- New simple time combining my custom enum with the standard usps one --> 
<xsd:simpleType name="LocationStateCodeSimpleType">
  <xsd:union memberTypes="usps:USStateCodeSimpleType my:USStateCodeDefaultSimpleType"/>
</xsd:simpleType>

Step 3 – Wrap the New Simple Data Type in a Complex Type

<!-- New complexType required to add s:id and s:idref to the definition -->
<xsd:complexType name="LocationStateCodeType">
  <xsd:simpleContent>
    <xsd:extension base="aoc_code:LocationStateCodeSimpleType"> 
      <xsd:attributeGroup ref="s:SimpleObjectAttributeGroup"/>
    </xsd:extension>
  </xsd:simpleContent>
</xsd:complexType>

Step 4 – Create Element Instantiating the New Code List

<!-- Element declaration allowing use of our new data type -->
<xsd:element name="NewStateCode" type="my:LocationStateCodeType" substitutionGroup="nc:LocationStateCode"/>

Now any place an nc:LocationStateCode can be use, our extended code list can be used instead.

Wednesday, July 25, 2012

XSLT: Convert Standard U.S. Date into xsd:date Format

When working with XML in the United States (U.S.), one will often find dates which have been formatted in the traditional U.S. Short Format even though XML Schema (XSD) enforces a more locale-neutral format.  This means often converting data from:

<SomeUsDate>1/10/2001</SomeUsDate>

Into:

<SomeXsdDate>2001-01-10</SomeXsdDate>

If one is using XSLT 2.0, this can simply be done by including and calling the function within the FunctX library here

In XSLT 1.0, a very limited set of string manipulation functionality exists. Even so, it is possible (although convoluted) to convert a typical U.S.-formatted date into an XML-Schema enforced date. A possible solution is listed below:

<xsl:template name="aoc:txfDateFormat">
         <xsl:param name="UsDate"/>

         <xsl:choose>

             <!-- Test to see if date contains a date with slashes in it. -->
             <xsl:when test="contains($UsDate, '/')">
                 <xsl:choose>

                     <!-- 2 Digit Month, 2 Digit Day -->
                     <xsl:when
                         test="string-length(substring-before($UsDate, '/'))=2 and (string-length(substring-before(substring-after($UsDate, '/'), '/'))=2)">
                         <nc:Date>
                             <xsl:value-of
                                 select="concat(substring-after(substring-after($UsDate, '/'), '/'),'-',substring-before($UsDate, '/'), '-', substring-before(substring-after($UsDate, '/'), '/'))"
                             />
                         </nc:Date>
                     </xsl:when>

                     <!-- 1 Digit Month, 2 Digit Day -->
                     <xsl:when
                         test="string-length(substring-before($UsDate, '/'))=1 and (string-length(substring-before(substring-after($UsDate, '/'), '/'))=2)">
                         <nc:Date>
                             <xsl:value-of
                                 select="concat(substring-after(substring-after($UsDate, '/'), '/'),'-0',substring-before($UsDate, '/'), '-', substring-before(substring-after($UsDate, '/'), '/'))"
                             />
                         </nc:Date>
                     </xsl:when>

                     <!-- 2 Digit Month, 1 Digit Day -->
                     <xsl:when
                         test="string-length(substring-before($UsDate, '/'))=2 and (string-length(substring-before(substring-after($UsDate, '/'), '/'))=1)">
                         <nc:Date>
                             <xsl:value-of
                                 select="concat(substring-after(substring-after($UsDate, '/'), '/'),'-',substring-before($UsDate, '/'), '-0', substring-before(substring-after($UsDate, '/'), '/'))"
                             />
                         </nc:Date>
                     </xsl:when>

                     <!-- 1 Digit Month, 1 Digit Day -->
                     <xsl:when
                         test="string-length(substring-before($UsDate, '/'))=1 and (string-length(substring-before(substring-after($UsDate, '/'), '/'))=1)">
                         <nc:Date>
                             <xsl:value-of
                                 select="concat(substring-after(substring-after($UsDate, '/'), '/'),'-0',substring-before($UsDate, '/'), '-0', substring-before(substring-after($UsDate, '/'), '/'))"
                             />
                         </nc:Date>
                     </xsl:when>
                 </xsl:choose>
             </xsl:when>

             <!-- Omit element if not. -->
             <xsl:otherwise/>
         </xsl:choose>
   </xsl:template>

Wednesday, March 31, 2010

Schematron: Supporting Form Validation in a Data Validation World

NIEM is for all intents and purposes a highly object-oriented data model which may, or may not be used by form entry tools at the time of data capture.  While this has enormous benefits, it can be detrimental if one wants to use Schematron for BOTH form and data validation in conjunction with NIEM.

In order to properly support form validation, source systems will often want to know exactly which field caused an error during the processing of business rules surrounding a form. While in many systems, the map between the source fields and the NIEM may be readily available, in cases where it is not or processing speed is critical, the data validation engine should be capable of furnishing this information back to the calling system.

Lets take the example of a citation data capture tool with the following example data entry UI:

image

NIEM supports the passing of a “footnote” on every element called the nc:Metadata element.  nc:Metadata is a complex data type that in turn includes an element to store the source-system’s field name called nc:SourceIDText.  The NIEM conformant XML instance to pass this would look something like the following:

<ns:CitationBatchDocument> 
  ...
  ...
  ...
  <ns:Citation> 
    ...
    ...
    <!-- Citation Number --> 
    <nc:ActivityIdentification> 
      <nc:IdentificationID s:metadata=”M1”>ABC123</nc:IdentificationID> 
    </nc:ActivityIdentification> 
    <!-- Citation Date --> 
    <nc:ActivityDate> 
      <nc:Date s:metadata=”M2”>2002-05-30</nc:Date> 
    </nc:ActivityDate> 
    ...
    ...
  </ns:Citation> 
  ...
  ...
  ...
  <nc:Metadata s:id=”M1”> 
    <nc:SourceIDText>CITE_NUM</nc:SourceIDText> 
  </nc:Metadata> 
  <nc:Metadata s:id=”M2”> 
    <nc:SourceIDText>CITE_DATE</nc:SourceIDText> 
  </nc:Metadata> 
  ...
  ...
</ <ns:CitationBatchDocument>

While passing the field name to the business rules engine is 1/2 the battle, one must also return the field name with any errors the data validation engine runs into.  An example Schematron code snippet to support returning the field name to the source system in the diagnostics would appear something like the following:

...
...
...
<pattern id="eBasicCiteRules">
  <title>Check the minimum basic citation rules.</title>
  <rule context="cite:CitationBatchDocument/cite:Citation">
    <let name="CiteNumSource" value="/cite:CitationBatchDocument
                                     /nc:Metadata [@s:id = current()
                                     /nc:ActivityIdentification
                                     /nc:IdentificationID/@s:metadata]
                                     /nc:SourceIDText"/>
    <assert test="nc:ActivityIdentification/nc:IdentificationID and
        string-length(normalize-space (nc:ActivityIdentification/nc:IdentificationID))
        &gt; 0" diagnostics="eCiteIdDiag">
            Citations must have a Citation Number.
    </assert>
  </rule>
</pattern>
...
...
...
<diagnostics>
  <diagnostic id="eCiteIdDiag">
    |<value-of select=”@CiteNumSource”/>|
    Some technical error description goes here (e.g. XPath to error).
  </diagnostic>
</diagnostics>

What this will yield to the end user is the following error message:

Citations must have a Citation Number.

What the source system will also receive in the case of any errors would look like the following:

|CITE_NUM| Some technical error description goes here (e.g. XPath to error).

The field name passed back could then be used by the source system in helping guide end users to complete the form correctly (e.g. jump to the first field with an error).  In the above example, simple “bar” delimiters are being used (|) but this could of course be changed to proper XML elements through the use of &gt; and $lt; instead.

EDITED 2010-04-01: Adding current() to XPath in Schematron code snippet.

Thursday, February 11, 2010

XSLT: Using the generate-id() Function

NIEM utilizes ID and IDREF elements heavily throughout the data standard.  While this is native to the W3C specification for XML Schema files (.XSD) and in no way “unique” to NIEM, it is used much more heavily in NIEM than in many other national and international standards. 

When converting or transforming to NIEM from another data standard, it quickly becomes necessary to generate unique identifiers in a common and consistent manner for key “noun” elements such as Persons, Places, Vehicles, and the like.  A number of home-grown functions are scattered around the Internet to do this, however a native XSLT function already exists to perform this task called generate-id()

Say the following non-NIEM-conformant XML payload is provided to a system processing citation data:

<CitationBatch>
  <Citation>
    <CitationNumber>123456</CitationNumber>
    <CitationDefendant>
      <FirstName>John</FirstName>
      <LastName>Doe</LastName>
      <PhoneNumber>123-456-7890</PhoneNumber>
    </CitationDefendant>
    <!-- Remainder Omitted -->
  </Citation>
<CitationBatch>

Within NIEM the <CitationDefendant> element above is termed the <j:CitationSubject> and includes a <nc:RoleOfPersonReference> rather than embedding all person information as child elements within the citation.  Additionally, the phone number for any given person is contained within a <nc:ContactInformation> element. 

The XSLT generate-id() function accepts a specific xml node as its input parameter and will consistently provide a unique ID for that node no matter where or how many times it is called from within the XSLT.  For example, take the following XSLT snippets:

<xsl:for-each select="$xmlInputFile/CitationBatch/Citation">
        <xsl:variable name="xmlCiteNode" select="."/>
        <j:CitationSubject>
            <nc:RoleOfPersonReference>
                <xsl:attribute name="s:ref">
                    <xsl:value-of select="generate-id($xmlCiteNode/CitationDefendant)"/>
                </xsl:attribute>
            </nc:RoleOfPersonReference>
        </j:CitationSubject>
    </xsl:for-each>
    ....
    ....
    ....
    <xsl:for-each select="$xmlInputFile/CitationBatch/Citation/CitationDefendant">
        <xsl:variable name="xmlCiteSubjectNode" select="."/>
        <nc:Person>
            <xsl:attribute name="s:id">
                <xsl:value-of select="generate-id($xmlCiteSubjectNode)"/>
            </xsl:attribute>
        </nc:Person>
    </xsl:for-each>
    ....
    ....

Even though the generate-id() function is called in two places within the transform, using two different variable names, the function will return the same exact yet unique ID as the XPath for both variables resolve to the same element in the input schema.  The output of the above would appear as the following:

....
....
<j:CitationSubject>
    <nc:RoleOfPersonReference s:ref="d0e8"/>
</j:CitationSubject>
....
....
<nc:Person s:id="d0e8"/>

This powerful function within XSLT dramatically ease ID and IDREF usage within XML and makes implementation of transforms to NIEM relatively trivial.

Monday, January 11, 2010

XSLT: Transform Date and Time Elements into nc:DateTime

While NIEM practitioners tend to merge Date and Time elements together into single nc:DateTime elements, we often find that the outside world separates these into two fields in their XML data packages.  For example, if someone were to use Java XForms or Microsoft InfoPath to capture data in an electronic form, it is common to separate these out into their component parts.

For example, assume a NIBRS report form exists and has discrete date and time values.  Using XSLT to merge these is quite simple and can be done using the concat() function as show here:

<?xml version="1.0" encoding="UTF-8"?>
<xsl:stylesheet 
    version="1.0" 
    xmlns:xsl="http://www.w3.org/1999/XSL/Transform"
    xmlns:ns="SomeNibrsOffenseReportNamespace"
    exclude-result-prefixes="ns">
    
    <xsl:output method="xml" encoding="UTF-8" indent="yes"/>
    
    <xsl:template match="/">
        <xsl:variable name="sInputSchema" select="."/>
        
        <OffenseReportDocument xmlns="SomeNiemOffenseReportNamespace" xmlns:j="http://niem.gov/niem/domains/jxdm/4.0" xmlns:nc="http://niem.gov/niem/niem-core/2.0">
          <j:Offense>
            <nc:ActivityDate>
              <nc:DateTime>
                <xsl:value-of select="concat(string($sInputSchema/ns:NibrsForm/ns:OffenseDate), 'T', string(sInputSchema/ns:NibrsForm/ns:OffenseTime))"/>
              </nc:DateTime>
            </nc:ActivityDate>
          </j:Offense>
        </OffenseReportDocument>
    </xsl:template>
</xsl:stylesheet>

In the above example, the concat() function allows us to merge the date (e.g. ‘2010-01-01’), the letter ‘T’, and the time (e.g. ‘12:00:00’) into a single string which in turn can be evaluated as a nc:dateTime element. 

1-13-10 – Edit for typo

Thursday, January 7, 2010

Schematron: Using the Number() Function Versus Casting

There are situations where it becomes necessary to test the value of a numeric element to ensure it meets some minimum or maximum value.  As Schematron is capable of treating any element as a string, it is generally a best practice to cast the value to a numeric data type first. 

For example, on a citation or a complaint document it may be necessary to check the fine or bail amount to ensure it is greater than zero.  This could be done with the following Schematron assert statement:

<assert test="xsd:double(nc:ObligationDueAmount) &gt; 0">
  Bail amount may not be less than zero.
</assert>

While the above would work when a value is provided in the nc:ObligationDueAmount element, an XSLT error would be raised in the following circumstances:

  • Value is blank or null
      • <nc:ObligationDueAmount></nc:ObligationDueAmount>
  • Value is omitted
      • <nc:ObligationDueAmount/>
  • Value is a string value
      • <nc:ObligationDueAmount>N/A</nc:ObligationDueAmount>

For this reason, it is often preferable to use the native XPath function number().  As described by Ms. Priscilla Walmsley in her O’Reilly book XQuery, this function will prevent the XSLT parser from throwing an error and instead return the value ‘NaN’ (Not a Number).  The following would be the same way the Schematron test could be written using the number() function instead:

<assert test="number(nc:ObligationDueAmount) &gt; 0">
  Bail amount may not be less than zero.
</assert>
<assert test="nc:ObligationDueAmount and string-length(nc:ObligationDueAmount) &gt; 0">
  Bail amount may not be left blank or otherwise omitted.
</assert>

While a few more lines are required, this prevents a runtime parser error from being raised and causing havoc with the validation engine.

Tuesday, December 8, 2009

Schematron: Trim Whitespace When Testing String Length

As discussed in previous posts, the string-length() &gt; 0 test is useful in checking to be sure null values are not passed; a validation step that raw XSD does not natively perform.  This ensures the following is NOT allowed:

<nc:PersonGivenName></nc:PersonGivenName>

It also prevents the following:

<nc:PersonGivenName/>

However, if white space is not trimmed, the following WOULD be allowed:

<nc:PersonGivenName>  </nc:PersonGivenName>

In order to trim leading and trailing white space, the built-in XSLT function normalize-space() can be used.  This in effect eliminates the above scenario where spaces have been inserted into the string.  This can be seen in the following example:

<assert test="string-length(normalize-space(nc:PersonGivenName)) &gt; 0"/>
  Person's first name may not be left blank.
</assert>

Be aware, that this function also eliminates redundant spaces between characters (including duplicate carriage returns and line-feeds) so a custom replace() function may be required if you wish to preserve those extra characters in your string length checks.

Monday, November 23, 2009

Schematron: Nesting XPath Values Within an XPath Predicate

In previous examples, we have seen the usage of a temporary variable or <let> tag to store a value which is later used in an XPath predicate (the square brackets surrounding the index of an element array).  It is important to note that this is not required.  A simple XPath statement can be used in the predicate for any other XPath statement.  For example see the following:

<pattern id="wEmptyMetadataComment">
  <title>Ensure person metadata comment is not blank.</title>
  <rule context="/ns:SomeDocument/nc:Person">
    <assert test="string-length(/ns:SomeDocument/nc:Metadata[@s:id=current()/@s:metadata]/nc:CommentText) &gt; 0">
      Comments regarding a person should not be blank.
    </assert>
  </rule>
</pattern>

In the above example, simply the attribute @s:id=/ns:SomeDocument/nc:Person/@s:metadata is used to identify which specific Metadata element should be examined.  With the context defined as /ns:SomeDocument/nc:Person, the rule will loop through each nc:Person element and use the appropriate @s:metadata value in each subsequent pass.

[Updated: Corrected Syntax on 04-01-2010]

Friday, November 13, 2009

Schematron: Validating NIEM Documents Against Non-Conformant Code Lists

Schematron rules and assertions are based upon XPath statements, which allow for a number of powerful XML querying capabilities. Two XPath capabilities leveraged and outlined in this section are doc() and XPath predicates which allow us to validate data captured in an NIEM XML instance against external code list of any kind.

Lets assume a scenario where we would like to validate an exchange document’s category against a predefined list of enumerated values.  This list is maintained by an outside party in a format other than NIEM and changes on a fairly regular basis. 

Traditionally, a NIEM practitioner would take this list and define an enumeration within an extension schema to enforce this code list.  Each time the third party makes a change to that code list, an updated NIEM extension schema would be created and redistributed.  This maintenance-intensive process could become overwhelming therefore the team chose instead to simply adopt the third-party list and keep it in the following non-conformant format relying instead on Schematron to perform the validation:

<?xml version="1.0" encoding="UTF-8"?>
<!-- List of Valid code Values -->
<CategoryList>
  <Category>a</Category>
  <Category>b</Category>
</CategoryList>

As shown in the above, the valid categories include the values “a” and “b”.  An example of a NIEM-conformant XML payload would look something like the following:

<ns:SomeDocument 
    xmlns:nc="http://niem.gov/niem/niem-core/2.0"    
    xmlns:ns="http://www.niematron.org/SchematronTestbed"
    schemaLocation"http://www.niematron.org/SchematronTestbed  ./SomeDocument.xsd">
  <nc:DocumentCategoryText>A</nc:DocumentCategoryText>
  <!-- Remaining Document Elements Omitted -->
</ns:SomeDocument>

In this example, the developers would like to perform the validation ignoring case, therefore the Schematron rule to validate the nc:DocumentCategoryText against the third-party-provided list would look something like the following:

<pattern id="eDocumentCategory">
  <title>Verify the document category matches the external list of valid categories.</title>
  <rule context="/ns:SomeDocument">
    <let name="sText" value="lower-case(nc:DocumentCategoryText)"/>
    <assert test="count(doc('./CategoryList.xml')/CategoryList/Category[. = $sText]) &gt; 0">
      Invalid document category.
    </assert>
  </rule>
</pattern>

Lets look at some of the key statements in the above Schematron example breaking it into individual parts. 

  • lower-case(nc:DocumentCategoryText) – This statement encapsulated in a <let> tag converts the text in the NIEM payload to lower case thereby ignoring deviations from the code list due to case.  It is then stored in a temporary variable named $sText.
  • doc('.CategoryList.xml')/… – This effectively points the parser at the third-party provided file (in this example assumed to be in the same directory as the .sch file) so that elements from that file can be referenced using the XPath in addition to elements in the source payload document. 
  • …/Category[. = $sText] – The usage of the square brackets ([ and ])  in  an XPath statement is considered a predicate.  Any number of predicate statements can be made to help filter values contained within an XPath, but in this case, the expression tells the parser to select all of the Category elements with the value contained in the variable $sText.
  • count(…) &gt; 0 – The XQuery count function returns the number of elements contained in the XPath.  If no match to the category existed, the count would return a value of zero, therefore we want to ensure the value is greater than zero meaning a match existed in the external code list.

Friday, November 6, 2009

Schematron: Enforce String Patterns in Schematron

In the general area of XML schemas, XSD “patterns” are commonly used to enforce special string formatting constraints.  This is a very powerful tool when a document recipient wishes to ensure that the sender provides string data in a consistent format.  A common example is the usage of a string constraint is to validate the structure of a Social Security Number (SSN).  This would be expressed in a typical schema in the following manner:

<xsd:simpleType name="SsnSimpleType">
    <xsd:restriction base="xsd:string">
        <xsd:pattern value="[0-9]{3}[\-][0-9]{2}[\-][0-9]{4}" />
    </xsd:restriction>
</xsd:simpleType>

As with most parts of NIEM, much of the model is based on inheritance which makes enforce of simple data types, such as that shown above, cumbersome and awkward.  Semantically, the correct element for an SSN would be under:

nc:Person/nc:PersonSSNIdentification/ nc:IdentificationID

Since nc:PersonSSNIdentification is an nc:IdentificationType, if one were to enforce SSN formatting on nc:IdentificationID, any other part of the schema that is derived from nc:IdentificationType would also need to abide by the same rules (e.g. Driver License Number, State ID Number, Document Identification, etc.).  In the past this situation led to one thing. . . extension.

With Schematron, extension for this purpose could be avoided.  Rather than enforcing the string constraints in the XSD file, instead the IEPD publisher could enforce this constraint within the Schematron rules document instead.  The following is an example of what code would be required in Schematron to accomplish this purpose:

<pattern id="ePersonSSN">
  <title>Verify person social security number is in the correct format.</title>
  <rule context="/ns:SomeDocument/nc:Person/nc:PersonSSNIdentification">
    <assert test=
      "count(tokenize(nc:IdentificationID,'[0-9]{3}-[0-9]{2}-[0-9]{4}')) 
      - 1 = 1">
       Social security number must be in the proper format (e.g. 11-222-3333).
    </assert>
  </rule>
</pattern>

By using the Schematron approach, the semantically equivalent element is preserved in the schema and only the appropriate identifier is subjected to the constraint.

This approach can be further extended to address any number of string constraints.  Another example would be ensuring an identification number only contains digits and has a string length of 5 or more.  This could be done by using the following XQuery count() query instead:

count(tokenize(nc:IdentificationID, '\d')) &gt; 5

This very powerful approach to constraining strings is yet another reason to take a real good look at Schematron in conjunction with your NIEM IEPDs.

Wednesday, November 4, 2009

Schematron: Correct nc:DateRepresentation Usage

The inherent flexibility of NIEM proves to be an incredibly beneficial when used correctly, however this benefit can also be one of its largest banes.  Sometimes this flexibility can lead to confusion when implementers attempt to deploy a NIEM exchange which is “valid” according to the XSD, yet not what the recipient is expecting. 

One such example is NIEM’s usage of substitution groups where a variety of data elements are legal according to the schema, but rarely are all of these legal options accounted for by the recipient’s adapter.  Take NIEM’s DateType as an example.  It employs the explicit substitution group (abstract data element) of nc:DateRepresentation which can be one of several different data types.  This representation can be replaced with a date (2009-01-01), a date/time (2009-01-01T12:00:00), a month and a year (01-2009), etc. 

Lets assume for a minute that a document has two different dates: a document filed date, and a person’s birth date.  The publisher’s intention is that filed date be a “timestamp” which includes both a date and a time, while the birth date is simply a date including a month, day and year.  A valid sample XML payload would look something like the following:

<?xml version="1.0" encoding="UTF-8"?>
<ns:SomeDocument>
  <nc:DocumentFiledDate>
    <nc:DateTime>2009-01-01T01:00:00</nc:DateTime>
  </nc:DocumentFiledDate>
  <nc:Person>
    <nc:PersonBirthDate>
      <nc:Date>1970-01-01</nc:Date>
    </nc:PersonBirthDate>
  </nc:Person>
</ns:SomeDocument>

The Schematron code to enforce the publisher’s intentions could appear as the following:

<pattern id="eDocumentDateTime">
  <title>Verify the document filed date includes a date/Time</title>
  <rule context="ns:SomeDocument/nc:DocumentFiledDate">
    <assert test="nc:DateTime">
      A date and a time must be provided as the document filed date.
    </assert>
  </rule>
</pattern>
<pattern id="ePersonBirthDate">
  <title>Ensure the person's birth date is an nc:Date.</title>
  <rule context="ns:SomeDocument/nc:Person/nc:PersonBirthDate">
    <assert test="nc:Date">
      A person's birth date must be a full date.
    </assert>
  </rule>
</pattern>

This is a great example of how Schematron can help clarify a publisher’s intent as NEIM-conformant services are developed and deployed.

Wednesday, October 21, 2009

Schematron: License Plate State is Required when a Number Exists

A common practice in transportation and law enforcement is to document a vehicle’s license plate number.  In many situations, this plate number must be accompanied by the state which issued the license plate. 

In NIEM, a vehicle’s license plate is contained within the nc:ConveyanceRegistrationPlateIdentification element which is an nc:IdentificationType.  Using schema cardinality, one could make a the state required by simply assigning a minOccurs=”1” to the nc:IdentificationJurisdiction element, however this can often cause more problems than it solves for two key reasons:

  1. Making jurisdiction required through schema cardinality makes it required globally throughout the exchange even if it doesn’t apply in those scenarios as many other elements in a typical NIEM exchange are also nc:IdentificationType data types.
  2. nc:IdentificationJurisdiction is an abstract data element that can be replaced with any number of elements, not all of which are enumerated state values.  Some are country codes, some are province codes for other countries and others are simply free-text. 

This presents another ideal use case for Schematron.  The following example code segment ensures a NCIC plate issuing state is included any time a Plate Identification exists:

<pattern id="eVehiclePlateState">
  <title>Ensure a plate state is included with a plate number.</title>
  <rule context="ns:MyDocument/nc:Vehicle/nc:ConveyanceRegistrationPlateIdentification">
    <assert test="j:IdentificationJurisdictionNCICLISCode">
      A plate state must be included with vehicle license plate.
    </assert>
  </rule>
</pattern>

The same segment can be modified to enforce any of the available jurisdiction code lists.  For example, an exchange in Canada may wish to check for the existence of j:IdentificationJurisdictionCanadianProvinceCode instead of j:IdentificationJurisdictionNCICLISCode

Monday, October 12, 2009

Schematron: Use Phase for Errors and Warnings

Schematron allows for grouping of rules not only by XPath, but also through association using the “Phase” element. While this has long been recommended as an approach for improving validation performance and unit testing, Phase also serves as an excellent way to group together and differentiate between critical errors and simple warnings.

For example, an agency might choose to have some minimum data restrictions surrounding Officers and Agencies on a electronic citation that can not be overlooked, and at the same time have warnings surrounding statue codes that do not match the known state code values. In Schematron the following would the the code matching this scenario:

<!-- Rules resulting in just warnings (should not prevent submission) -->
<phase id="Warnings">
  <active pattern="validStatute"/>
</phase>
<!-- Rules resulting in errors (must prevent submission) -->
<phase id="Errors">
  <active pattern="minOfficerData"/>
  <active pattern="minAgencyData"/>
</phase>

The pattern attribute is an IDREF to a related pattern ID somewhere in the document. A developer can then create code to prevent the submission of any validation errors resulting from only one of the above phases. Schematron validation engines typically have command line switches or parameters to specify which phase should be run. For example, in Xerces’ implementation of Saxon, the parameter “phase=x” is used where x is one of the phase id’s listed above or “#ALL” if all phases should be processed.

Friday, October 9, 2009

Schematron: Recommended Reading

What books exists out there that detail Schematron and how to use it?
Best one I've seen to date is "Schematron" from O'Reilly Media available in electronic (Adobe PDF) format for $9.99 USD. Provides a great overview and set of examples using Schematron, albeit exclusively in hierarchically linked XML documents. It does assume the reader already has a strong understanding of XML and XSLT. If you are a bit rusty on XSLT or XQuery, you'll want to pick up a book on that as well.

Wednesday, October 7, 2009

Schematron: Officer Has a Last Name

This is the first in a series of code example articles that will be posted to give NIEM developers a head start in using Schematron. This example will show how to perform a test across multiple branches or nodes of a typical NIEM schema as law enforcement officer is a role played by a person in NIEM schemas. Take the following example XML code:

<ns:SomeDocument>
<j:Citation>  
   <j:CitationIssuingOfficial>
     <nc:RoleOfPersonReference s:ref="P1"/>  
   </j:CitationIssuingOfficial>
</j:Citation>
<nc:Person s:id="P1">
   <nc:PersonName><nc:PersonSurName>Smith</nc:PersonSurName></nc:PersonName>
</nc:Person>
</ns:SomeDocument>

One way in which to test for the existence of a last name is to match the ID with the officer's REF and test to be sure the string length is greater than 1 as shown in the following example (using XSLT2 & ISO Schematron):

<pattern id="eOfficerData"> 
    <let name="sOfficerRef" value="ns:SomeDocument/j:Citation/ j:CitationIssuingOfficial/nc:RoleOfPersonReference/@s:ref"/> 
    <rule context="ns:SomeDocument/nc:Person"> 
        <report test="@s:id = $sOfficerRef and string-length(nc:PersonName/nc:PersonSurName) < 1"> 
            Officers last name must be provided. 
        </report> 
    </rule> 
</pattern>

In theory the same test can be done using the XQuery id() function however use of the id function is HIGHLY dependent on the parser's capabilities.